

Updated 2018-06-26!
If You started with my quick instal guide You are a little familiar with OpenPlotter, (OP), basics and now we proceed with the sensors. Don't forget to delete the RMC sentence from the "NMEA 0183 generator" which we used.
Link to a stand alone AIS receiver.
Not valid for OP Beta V2 !! Check here !
Prior V 1.x.x In OP there is clever function that attempts to auto detect the connected USB devices This function auto starts until You uncheck the "setup autostart on every boot". If You want to start this manually it is found in OP=> Tools => Auto Setup. Please note that just USB serial devices will be listed. If You connect a SDR-USB for AIS reception it will not show in the "USB manager" because it s not a serial device.
Read the log from auto setup and check what have happened and then open the "USB manager" tab. If the USB-devices don't show up but are found You have to add them manually according to the instructions.
If the devices are NMEA 0183 they should also be configured at the NMEA 0183 tab. This tab is a graphical user interface for the multiplexer which handles all the NMEA0183 inputs and also forwards the NMEA 0183 sentences to the plotter OpenCPN, (OC) and the "engine" SignalK. Follow the instructions and also use the nice diagnostic feature to check the actual data from the sensor.
If the device is a NMEA 2000 it will be handled under tab NMEA 2K and follow the instructions.
If the device is a SDR-USB/DONGLE for receiving AIS information it will not show in the "USB manager" tab but You will notice if it works during the activation procedure. The latest version V.3 don't have to be calibrated but still You have to;
- In the OP meny =>Tools => SDR Receiver” => click on ”Calibration”
- Write down the largest value of ”Supported gain values” (with dot as separator)
- Fill in this value in ”Gain” and 0 in the field ”Correction (ppm)”
- Mark ”Enable AIS reception” and open the OP tab NMEA0183
- Mark the row named ”system_a” and click on ”Diagnostic”
- A window with VDM sentences should appear
It is said that You have to have an external USB-hub with power supply, using the SDR HW, but try the following trix to rise the output from the Raspberry Pi, (RPi), USB to 1.2 Ampere instead of 0.6 A. Please note that the power supply supplying the RPi have to deliver at least 2.5 A. If the red power lamp flashes You are below 4.6 Volts.
Open the Terminal and use the following to edit the config file.
sudo nano /boot/config.txt
add the following text to the end of the file
max_usb_current=1
save the file and reboot
sudo reboot
V1.x.x
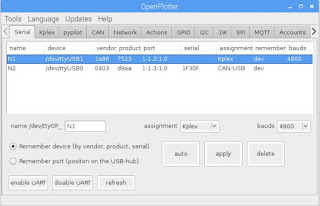
Connect the USB devices, open OP and go to the "Serial" tab. Click on "refresh" and the USB devices shall appear. In the enclosed picture both a NMEA0183(N1) interface and a NMEA2000(N2) is connected.
Mark the N1 row and put a name in the "name/dev/ttyOP_" field. Choose "Kplex" in the "assignment" drop down and select a rate in the "bauds" drop down. Click on "Remember device" and finally click on "apply".
Assign the fields for N2 row.
No comments:
Post a Comment
Feel free to leave a comment ! ... but due to a lot of spam comments I have to moderate them. Will reply ASAP !