
Shelly 1 quick install
Updated 2023-05-04 !
This post focus on Shelly 1(S1), a really a nice automation device with great versatility, but much of the content is also valid for some of Shellys other devices using the gen1 API.
Setup for the later version, Shelly Plus 1, is found here !!
S1 is a WiFi switch, 16 Amps, with dry contacts and the function "without Internet" + that the S1 can use a 12V DC source makes it perfect for an "use case" in a boat/mobile home.
It's compatible with Alexa, Google or HomeKit using HomeBridge or as a "native" HomeKit device using Mongoose firmware(Flashed via a standard WEB browser !)
Intro
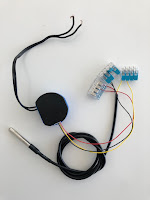
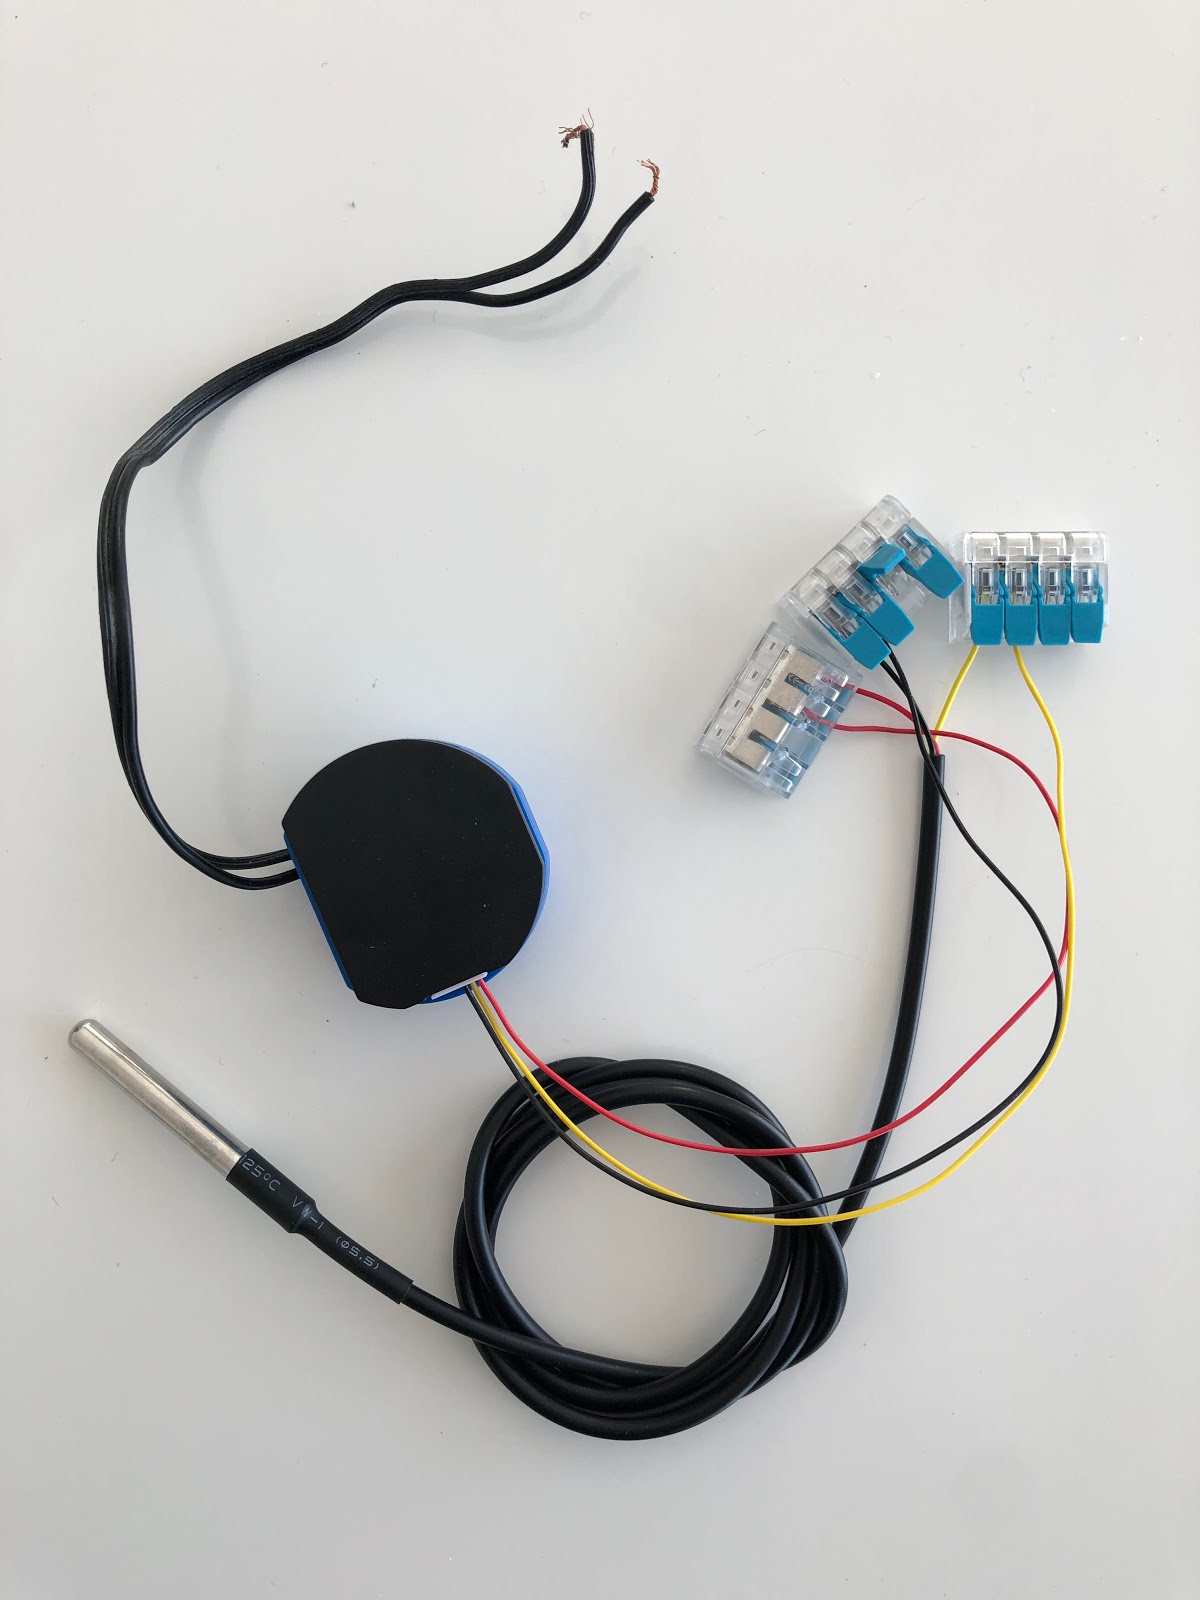
Temperature measure
Please note that it can not, anymore, be a hub for temperature sensors due to that there are no supply of the "hat". Please check out this add on instead which work with "Plus" devices.
Other firmware
With a great software package pre installed You probably don't need anything more, but since it is an ESP8266 You can also flash it with Your own/other, Mongoose, firmware.
Shelly app
Link to the Shelly apps, the inclusion manual and the knowledge database where You will learn about the basic functions.
Installing a S1
App way
S1 devices with old firmware could create errors with the app. If so, check the WEB-server setup instead and factory reset below.
The simple way is using the Shelly app.Register an account at Shelly and then connect S1 to a powersupply. Then "Settings => Add device => Choose Wifi-network => Next => Shelly 1" and accept the inclusion to Your network. Click on "Home => Discovered devices => Click to add => Add device name => Choose Room for device => Choose device picture => Save device". Then You continue with connecting to the cloud.
Go on clicking on the device and then check if there is a firmware update
WEB-server way
MQTT
Is nice presented here
Direct Device to Device communication
This means that each device can communicate with another one without a server or cloud connection. There are 3 x 2 possible actions
More info is found here
Another way !!!! to use this function is setting up an HTTP end node, for example in Node Red, which is monitoring the change in the switch. With settings
You will get an "1" for switching ON respective "0" for OFF.
Cloud API
Accessing the Shelly cloud API is described here
Support
Link to the Shelly apps, the inclusion manual and the knowledge database where You will learn about the basic functions.
Installing a S1
App way
S1 devices with old firmware could create errors with the app. If so, check the WEB-server setup instead and factory reset below.
The simple way is using the Shelly app.Register an account at Shelly and then connect S1 to a powersupply. Then "Settings => Add device => Choose Wifi-network => Next => Shelly 1" and accept the inclusion to Your network. Click on "Home => Discovered devices => Click to add => Add device name => Choose Room for device => Choose device picture => Save device". Then You continue with connecting to the cloud.
Go on clicking on the device and then check if there is a firmware update
WEB-server way
- Power up S1 by connecting L and N to mains/power supply
- At first startup S1 will create its own WiFi with SSID "shelly1-XX". XX => individual serialnumber.
- Connect a device with WEB-browser to the WiFi SSID "shelly1-XX"
- In the browser, use IP 192.168.33.1, or hostname "shelly1-XX" for the Shelly web interface
- Select "Internet & Security =>WiFi mode Client => Connect the Shelly Device to an existing WiFi network"
- Use Your local Wifi setting
- Optional is static IP address
- Click "Connect"
- Connect Your WEB-browser device to the same WiFi
- Access the S1 with its hostname "shelly1-XX" or the assigned IP On linux use "arp -e"/Mac "arp -al" to check or the router device list
- With an Internet connection, Select Settings, FIRMWARE UPDATE, UPDATE FIRMWARE, YES (then wait…)
Now the basic setup is done.
Remark
If you are having problem updating to the latest firmware don't use static IP adress.
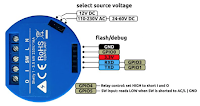 S1 hardware
The switch
The S1 pinout is shown in the picture
Wiring
Factory reset
Built in WEB-server
You don't even have to have the devices connected to Your WiFi because, check "WEB-server way" above, they have their own built in WEB-server which, at first start up, creates its own WiFi acting as an Access point.
HTTP API
The API documentation is found here but I will show some examples, for HTTP GET request, which maybe will make Your start easier.
For example check the status use. (The URL can be used in a ordinary browser)
http://shelly1-E098068DAAA1/status
where "E098068DAAA1" should be substituted with Your serial number for the actual device. Another way could be using the device IP adress which shall substitute "shelly1-E098068DAAA1". The request will return a JSON answer specified here.
To turn on the relay use
http://shelly1-E098068DAAA1/relay/0/?turn=on
The "0" is the channel, which in this case with a S1 could just be "0" because You just have one relay. Other products may have several channels.
So the syntax is
http://[deviceIP]/relay/[channel]?[command]&[command]
where command could be
 S1 hardware
The switch
The S1 pinout is shown in the picture
Wiring
Here You find wiring/connection diagrams. You have to create a account on the support site.
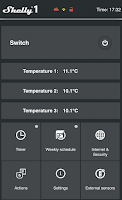
External switch
And don't miss that You via "Settings => Button type" can change the behavior of the connected external switch.
Shelly softwareExternal switch
And don't miss that You via "Settings => Button type" can change the behavior of the connected external switch.
- Momentary
- Toggle Switch
- Edge Switch
- Detached Switch
- Activation Switch
- Reverse inputs
Factory reset
- Restore power.
- Within the first minute, toggle a switch connected to the "SW" input on the Shelly 5 times on/off (10 total) or press and release momentary button 5 times.
- The Shelly relay should click rapidly and the device will be reset to factory settings.
Another way is to use the app or WEB interface using "Settings => Factory Reset"

Built in WEB-server
You don't even have to have the devices connected to Your WiFi because, check "WEB-server way" above, they have their own built in WEB-server which, at first start up, creates its own WiFi acting as an Access point.
HTTP API
The API documentation is found here but I will show some examples, for HTTP GET request, which maybe will make Your start easier.
For example check the status use. (The URL can be used in a ordinary browser)
http://shelly1-E098068DAAA1/status
where "E098068DAAA1" should be substituted with Your serial number for the actual device. Another way could be using the device IP adress which shall substitute "shelly1-E098068DAAA1". The request will return a JSON answer specified here.
To turn on the relay use
http://shelly1-E098068DAAA1/relay/0/?turn=on
The "0" is the channel, which in this case with a S1 could just be "0" because You just have one relay. Other products may have several channels.
So the syntax is
http://[deviceIP]/relay/[channel]?[command]&[command]
where command could be
| turn=on | switch output ON |
| turn=off | switch output OFF |
| turn=toggle | reverse state |
"on" and "off" can be combined with command "timer" where output will be turned ON or OFF for X seconds and then will be switched back to previous state.
| timer=X | X is in seconds |
MQTT
Is nice presented here
Direct Device to Device communication
This means that each device can communicate with another one without a server or cloud connection. There are 3 x 2 possible actions
- BUTTON SWITCHED ON/OFF URL
- BUTTON LONG/SHORT PRESSED URL
- OUTPUT SWITCHED ON/OFF URL
More info is found here
Another way !!!! to use this function is setting up an HTTP end node, for example in Node Red, which is monitoring the change in the switch. With settings
OUTPUT SWITCHED ON URL
|
http://home:1880/shelly/1
|
OUTPUT SWITCHED OFF URL
|
http://home:1880/shelly/0
|
Cloud API
Accessing the Shelly cloud API is described here
Support
The Shelly support WEB-page


Comments
Post a Comment
Feel free to leave a comment ! ... but due to a lot of spam comments I have to moderate them. Will reply ASAP !