Posts

Showing posts with the label HomeKit

Home Assistant core install, Raspberry Pi and Python 3.12 & 3.13

Image
Updated 2025-06-02 ! This will soon be a deprecated installation method !! The best way to start with Home Assistant (HA), and Raspberry Pi(RPi), is off course to use the ”Raspberry Pi imager” and in the menu select " Other specific-purpose OS => Home Assistant and home automation => Home Assistant ". This will install the HA operating system. It works very well and here are the install instructions .  On the other hand if you want to add HA to a RPi which you already have up and running, without Docker, you need to install something which is called " Home Assistant Core ". Please check the " Remarks " below before you start. New version for Python 3.13 ! Below info is not updated but just change from 3.12 to 3.13 

IKEA Bäve dimmer hack II

Image
Updated 2025-01-10 ! Dimming not dimmable LED, IKEA Bäve, produced before 2019-11 and a new idea for later products ! In former post I used a  Fibaro Z-Wave RGBW controller  but in this post I will use an IKEA original or an external dimmer ?!

Matter bridge, with Shelly, or non Matter devices

Image
Matter is a smart home standard currently being developed by a consortium of over two hundred companies, including big players such as   Apple ,   Google ,   Phillips ,   Amazon   and   Samsung . Many new devices have Matter implemented, from the beginning, but devices, such as most of Shelly devices don't. On the other hand many hubs can be upgraded to Matter support. For example an Apple TV. With a Matter bridge  you can solve the incompability. This post will use  Matter bridge plugin Manager and the Shelly plugin  but it could be other devices shown in the picture below.

IVT, Bosch heat pump easy integration, Home Assistant
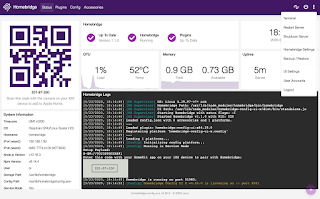
Image
In search of the optimal solution on how to interface our IVT Heat pump,   first try here , I stumbled over   a nice integration   for Home Assistant(HA). A first quick setup is shown at the right. The first obstacle was that it was HA which I knew about but never used.  So it was "back too school" and doing  a blog post  about a HA Core install.

Homebridge made simple, Homebridge

Image
Updated 2023-10-26 ! HomeBridge (HB) is the software where You make Your home automation devices appear in the Apple Home App as native products. In this post a Raspberry Pi  is used as the HB server. There has really been big improvements in the installation process and I think the HB version is better/easier than HOOBS . Migrate from HOOBS ?! Link

Apple HomeKit doing Matter upgrade with Hombridge

Image
Matter is the the new standard making your smart home devices talking to each other and some Apple Home hubs can be updated. There is a nice article from "The Verge" which explains it all. Using Homebridge (HB) it could be nice to know what happens when you upgrade your HomeKit hub to the new standard so  his post will just give some quick tips Here is  a support article from Apple and please note that if you upgrade you will not be able to use an iPad as a Home hub anymore.

Shelly 1 quick install

Image
Updated 2023-05-04 ! This post focus on  Shelly 1 (S1), a really a nice automation device with great versatility, but much of the content is also valid for some of  Shellys other devices  using the gen1 API. Setup for the later version,  Shelly Plus 1 , is found here  !! S1 is a WiFi switch, 16 Amps, with dry contacts and t he function "without Internet" + that the S1 can use a 12V DC source makes it perfect for an "use case" in a  boat /mobile home. It's compatible with Alexa , Google  or HomeKit using HomeBridge  or as a "native" HomeKit device using  Mongoose firmware (Flashed via a standard WEB browser !)

Shelly PLUS 1 quick install

Image
Updated 2023-05-03 ! In a  former post I made a writing about Shelly 1 (S1) and this post will handle about the successor Shelly PLUS 1 (SP1)  but much of the content is also valid for some of  Shellys other devices  which uses the same software/API. To keep it simple, SP1 is a WiFi switch, 16 Amps, with dry contacts but compared to the S1 the hardware and the software is updated.  The function "without Internet" + that the SP1 can use a 12V DC source makes it perfect for an "use case" i n a boat/mobile home .

HomeKit bridge with Shelly/Shelly 1

Image
Updated 2023-05-01 ! I really recommend flashing, via WEB-browser, the device with Mongoose software to avoid Homebridge.   HomeBridge is used for this setup and to make it appear in the Apple Home app. The main advantage with the Shelly devices are that they are WiFi enabled and therefore You don't have to use a hub, this compared to z-way/zigbee and some other solutions.  First install Shelly1 (S1).

Z-Wave on Raspberry PI

Image
Updated 2023-02-23 ! Installing a Z-Wave controller on Raspberry Pi is much easier than You think. The only add on You need is the Razberry Z-wave Shield and free software from the same site.

Ring doorbell install and relay

Image
The electrical install instructions for the Ring Doorbell maybe could be a little easier to find  ?  So will give some links where you are connecting to Internal doorbells No internal doorbell but charging the battery External relay, triggering "anything" Wireless relay Ring Device manuals are found here .

Homebridge made simple, HOOBS

Image
Updated 2021-08-08 ! I have written several post about the HomeKit Bridge, Homebridge (HB), but if You want another simple way, with GUI, to handle the server and plugins the guys at HOOBS  have done a nice software package. I personally prefer the Homebridge  "native" install , which seems to be updated more frequently.

HomeKit bridge with Z-Wave

Image
Updated 2021-05-21 ! These devices are available for Apples HomeKit. The devices are Bluetooth, BLE, or WiFi connected so it could be a limited range in Your house. The Z-Wave solution have a smarter setup running on a type of network called a " mesh network ". One Z-Wave product will pass the signal along to another (“hop”) until the final destination is reached. Every device, not battery charged, acts as a messenger; the more devices you have, the more powerful and strong your network is. Raspberry USB SSD boot made simple ? Check link  

Homekit, temperature with DS18B20

Image
Updated 2021-04-15 ! A cheap and simple way to measure temperature, and have it displayed in the Home app, is to connect one wire (1W)  DS18B20  (DS)temperature sensors direct to the Raspberry Pi(RPi) and install a DS plugin. This assumes that You have Homebridge up and running on a Raspberry Pi  Check this post !!    "ANY" temp source  can be HomeKit enabled.

Homebridge, retrieve accessories information & status

Image
Having Homebridge (HB) up and running it's simple to retrieve and visualize  status or measurements from accessories. For example I'm using the Aeotec MultiSensor 6 ,(AM6), via the z-way plugin , where I'm sensing the light level. Since Im living in northern Europe it's not very accurate to switch the indoor lightning by sun-rise/set. So instead I'm using the AM6 together with the EVE app  to switch the lightning.  To visualize the measured values over time I'm using NodeRed (NR) and a HomeBridge plugin

Homebridge, autostart with systemd

Image
Updated 2020-07-10 ! systemd is service manger which autostart jobs and it will even  restart the Homebridge(HB) job if it fails !   Keep it simple !! New post with  a script which handles the setup automagically !! or use the latest HB install where this is included. Other   HomeKit posts   on this Blogg

HomeKit, Z-Wave, Telldus Live, and...

Image
Updated 2023-10-10 ! You can use one   Raspberry Pi to Make Your home automation devices appear in the Apple Home App Being the Z-Wave controller HomeKit enable Your Z-Wave devices HomeKit enable Your devices registered at Telldus Live HomeKit enable IKEA TrÃ¥dfri devices  Homekit enable temperature with sensor  DS18B20 HomeKit enable Broadband speed If You have other products there are more than 4200 plugins  available A new simple install  !! is found here  so skip the below info if you aren't interested of the old way!

HomeKit showing Humidity & Internetspeed

Image
From AppleWatch Strange mixture ? Humidity & Internetspeed ?  With HomeKit You can't show Your measured Internet speed in a proper way,  X Mbit/s. So why not show it in % ? the measured speed compared to the one You purchased from Your ISP(Internet Service Provider) ?  So now You see the point..... Humidity is also in % and can be displayed in the Home app. The only "if" is that the speed is displayed along with a "water drop"..... but maybe You can live with that ? 

HomeKit with "ANY" temperature source

Image
From AppleWatch As long as it's possible to retrieve information, in some way, from a sensor OR a website/webserver, with temperature information, it's possible to show it in HomeKit with HomeBridge (HB). In this post  NodeRed (NR) is retrieving the temperature from Your selected source and is also acting  as the WEB endpoint   for  the HB  " homebridge-http-temperature " plugin . In my case I wanted an outside temperature so used the measurements from our Davis Weather station and their  JSON REST API but it could for example be Your Raspberry CPU temp  or showing the speed of Your Internet connection.

Homebridge update installation on RPi

Image
Updated 2023-10-27 ! ! The latest information on Homebridge update is found here !   Start updating the Homebridge(HB) installation , after You logged on to the  RPi, with; sudo apt update &&  sudo apt full-upgrade  -y If You are using HOOBS or Homebridge with UX their updates can be done via respective GUI interface. HB also have a function to update Node.js . In other words, the info below is more like "nice to know".