Homebridge made simple, Homebridge

There has really been big improvements in the installation process and I think the HB version is better/easier than HOOBS.
Migrate from HOOBS ?! Link
Homebridge images
Manually install
If You want to start from scratch, with a new SD card, there are instructions here how to install the Raspberry Pi OS. Please note that its sufficient with a RPi OS Lite install since HB have its own web-server.
Then I followed these instructions to install HB.
Autostart
A systemd service will be installed which will autostart the HB server at power on and restart it at failure. Could be checked with
$ sudo systemctl status homebridge
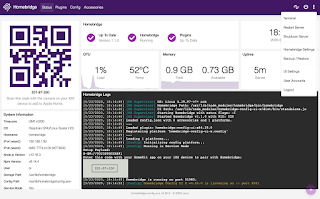
WEB UI
where You create a new user and add the password.
And now You are done and can install the plugins that fits Your usage. This is done in the UI, clicking on the tab "Plugins" and then search for, as an example, the "RING" plugin.
Install and then click on "NPM" where You will get help for the settings part. Complete the installation with restarting the server and check the log window.
Additional help can be found in the WiKi and checking the other HB posts in this blog.
In the home app click on the "+" sign in the upper right part, "Add Accessory => Scan a Setup Code"
Scan the code, in the WEB UI to the upper left, with the camera, on your iPhone/iPad, and then "Add to home".
$ npm outdated -g --depth=0
Package Current Wanted Latest Location Depended by
corepack 0.18.0 0.22.0 0.22.0 node_modules/corepack global
homebridge-config-ui-x 4.51.0 4.51.1 4.51.1 node_modules/homebridge-config-ui-x global
node-red 3.0.2 3.1.0 3.1.0 node_modules/node-red global
npm 9.6.7 10.2.1 10.2.1 node_modules/npm global
$ sudo npm install -g npm@latest
$ cat /var/lib/homebridge/homebridge.log or $ sudo hb-service logs
Authentication
CLI functions
To show the additional functions in the "hb-service" command just type
$ sudo hb-service
Port number
If You want to change the default port number for the UI please use one above 1024, due to permissions.
User Homebridge
Please note that the HB application us running with user "homebridge". From install log
Adding system user `homebridge' (UID 115) ...
Adding new group `homebridge' (GID 125) ...
Adding new user `homebridge' (UID 115) with group `homebridge' ...
Creating home directory `/home/homebridge' ...
Uninstall Homebridge
HOOBS
And as said it's simple to migrate from HOOBS to Homebridge with a HOOBS backup. All settings and plugins are very nice restored !!


Comments
Post a Comment
Feel free to leave a comment ! ... but due to a lot of spam comments I have to moderate them. Will reply ASAP !