
AIS receiver and dispatcher ! The best ?!

Updated 2026-06-30
It is compatible with a wide range of Software Defined Radios (SDRs).
These include RTL-SDR dongles (such as the ShipXplorer AIS dongle and
RTL SDR Blog v4), AirSpy (Mini/R2/HF+), HackRF, SDRPlay, SoapySDR, and
file/network input (ZMQ/RTL-TCP/SpyServer).
Intro
Please note, that since a while this package is installed, by default, in OpenPlotter(OP) by installing OP:s "SDR VHF" app.
Output
AIS-catcher can deliver output in the form of NMEA messages, default, which can be
conveniently displayed on screen or forwarded via UDP/HTTP/TCP.
With this approach it's simple to forward the NMEA to aggregators, type
Marintraffic, Vesselfinder or to some other local application.
It also includes a WEB server, not activated by default, that can serve a lot of information including the picture above.
Charts
Here is info how to use
off-line charts.
Source another application
If you already have an application, OpenCPN, Signal K, Navionics App or ...... ?, showing charts and accepts NMEA 0183 AIS input it's easy to use this app as just a receiver, without the WEB-server function, and use for example the UDP output for the other application.
This app have better sensitivity and lower CPU load than other I
used so in my case it's the source for Signal K to display the targets, see setup info below. Another popular application is OpenCPN.
Warning !
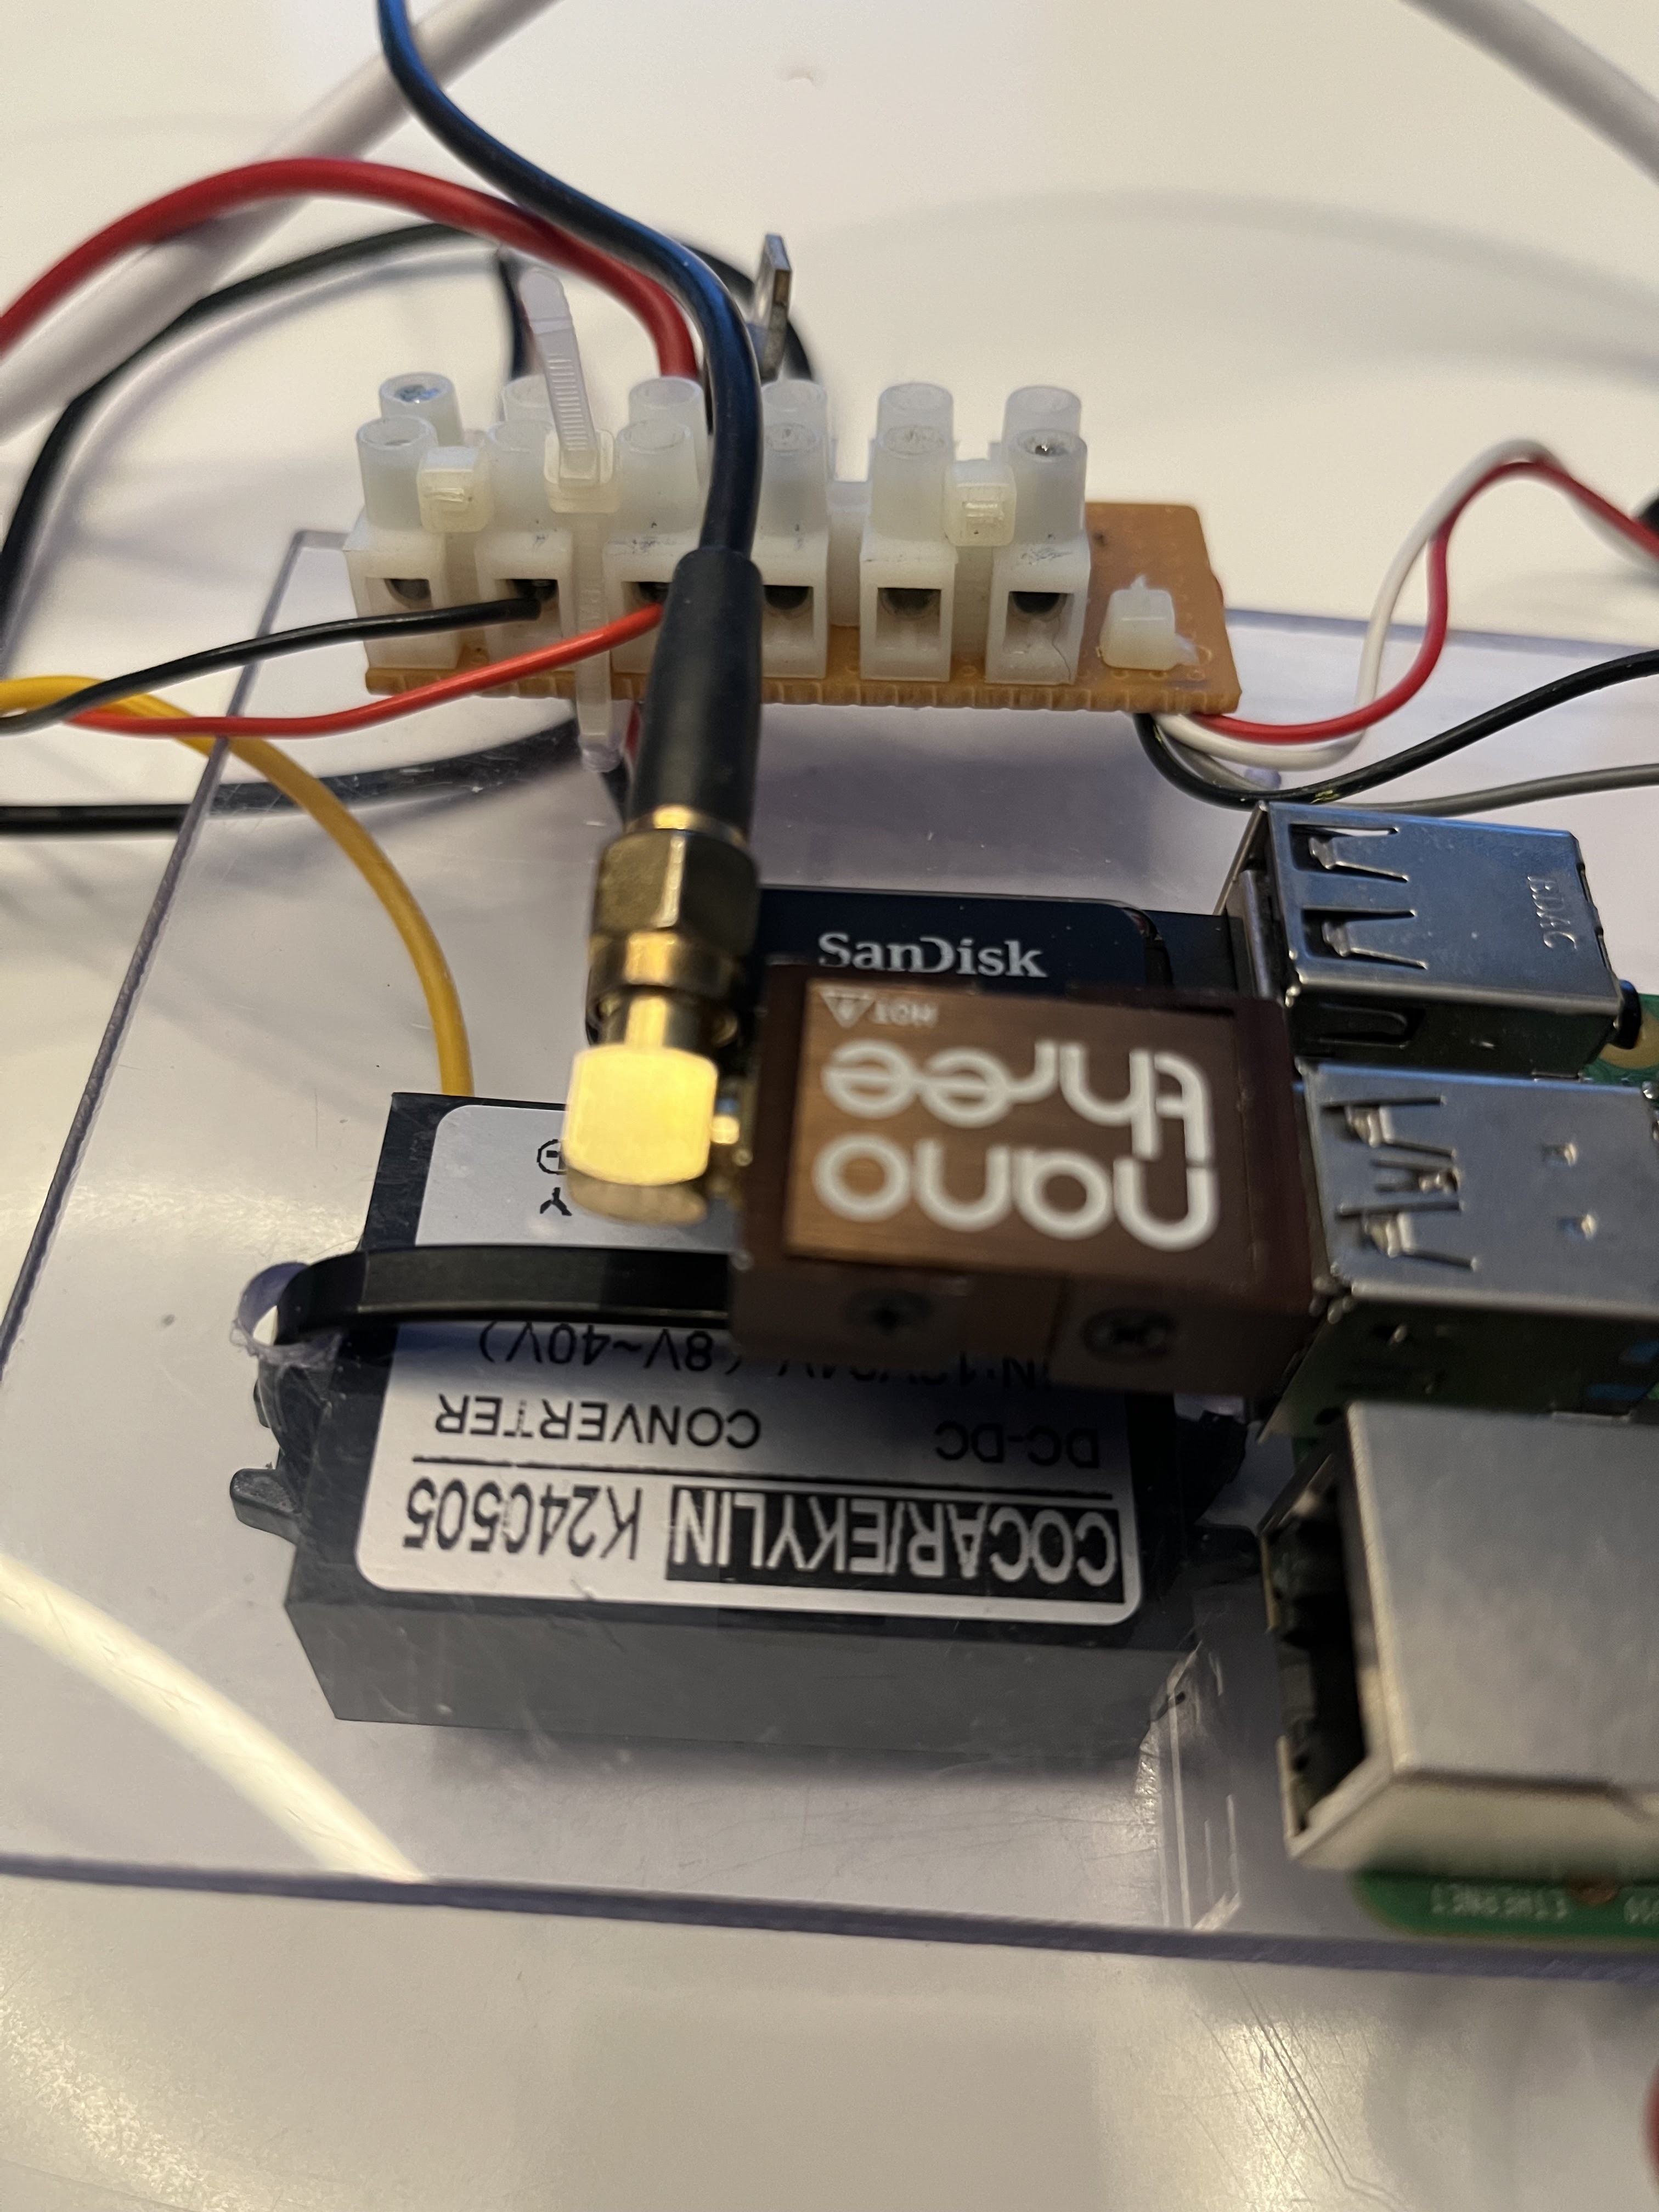
I'm using this setup on our boat and there using a simple buck converter, 12V DC => 5V DC, to source the Raspberry Pi 4. In this case the converter was placed direct below the SDR and interfered so much that there was almost no reception. So check for a good power supply, away from the dongle, and shielding.

As a last measure I added a ferrite bead on the USB cable which also increased the reception range.
Automatic install
There is a "Quick start guide" with different install scripts which will do the install in a elegant way together with autostart jobs. One will build from source and the other one will use precompiled binaries. But if you want to minimize the install size and have full control you can follow the "Manual install" instructions below.
How to participate
AIS-catcher -v 10 -u 127.0.0.1 10110 -N 8100 -N LAT 56.00 LON 12.00
SHARE_LOC on -X
If you are on version >= v0.58 you can register your station and add the given UUID to the -X parameter.
Signal K
To source Signal K(SK), could also be OpenPlotter or OpenCPN, start AIS-catcher with command
AIS-catcher -o 0 -u 127.0.0.1 10110
"-o 0" will suppress NMEA messages so they don't end up in the log. To receive the messages add a connection, in SK, with datatype "NMEA0183", Source "UDP", port "10110".
To autostart AIS-catcher just use the info below and the command above.
Watchdog
To secure the running application you can
apply a Watchdog.
Remarks
CPU Load
Also did a test with a RPi Zero W, running the recommended RPi OS 32 bit
Bullseye, and it didn't perform as god as the mentioned
RPi3 with 64 bit Bookworm. This despite that I used
option -F
which really decreased the CPU load. The RPi 3 detected about 50% more AIS
targets. In
this comment
there are some trix you can check.
Calibrate
If you are using an older or cheaper SDR-RTL don't forget to
calibrate !
Check out this info regarding Frequency Shift
which can help. So if the chart "Frequency Shift (avg PPM per hour)" is showing -2.5 test to use, in the command line, "-p -2.5" to
compensate the SDR-RTL:s deviation from the correct frequency.
Manual install(from source)
The application is very well documented, also the install, but the below instructions will cover a simple install on a Raspberry Pi 3(RPi), Bookworm Lite 64 bit, with a RTL-SDR, Nano 3, USB dongle mounted.
On a updated RPi, with hostname "test", run the following commands
sudo apt install librtlsdr-dev
*With GIT
sudo apt-get install git make gcc g++ cmake pkg-config -y --depth 1
git clone https://github.com/jvde-github/AIS-catcher.git
*
*Without GIT (=> Like this approach to do a minimal install. Pick the latest)
sudo apt-get install make gcc g++ cmake pkg-config -y
wget https://github.com/jvde-github/AIS-catcher/archive/refs/tags/v0.70.zip
unzip v0.70.zip && mv AIS-catcher-0.70 AIS-catcher
*
cd AIS-catcher
mkdir build
cd build
cmake ..
mkdir build
cd build
cmake ..
-- The C compiler identification is GNU 12.2.0
-- The CXX compiler identification is GNU 12.2.0
-- Detecting C compiler ABI info
-- Detecting C compiler ABI info - done
-- Check for working C compiler: /usr/bin/cc - skipped
-- Detecting C compile features
-- Detecting C compile features - done
-- Detecting CXX compiler ABI info
-- Detecting CXX compiler ABI info - done
-- Check for working CXX compiler: /usr/bin/c++ - skipped
-- Detecting CXX compile features
-- Detecting CXX compile features - done
-- Found PkgConfig: /usr/bin/pkg-config (found version "1.8.1")
-- Performing Test CMAKE_HAVE_LIBC_PTHREAD
-- Performing Test CMAKE_HAVE_LIBC_PTHREAD - Success
-- Found Threads: TRUE
-- Looking for linux/can.h
-- Looking for linux/can.h - found
-- Looking for linux/can/raw.h
-- Looking for linux/can/raw.h - found
-- NMEA2000: not found NMEA2000_LIB-NOTFOUND NMEA2000_INCLUDE-NOTFOUND
-- Checking for module 'libusb-1.0'
-- Found libusb-1.0, version 1.0.26
...
-- Checking for module 'zlib'
-- Found zlib, version 1.2.13
-- ZLIB: found - /usr/include, /usr/lib/aarch64-linux-gnu/libz.so
...
-- Checking for module 'librtlsdr'
-- Found librtlsdr, version 0.6.0
-- RTLSDR: found - /usr/include, /usr/lib/aarch64-linux-gnu/librtlsdr.so
-- Looking for rtlsdr_set_bias_tee
-- Looking for rtlsdr_set_bias_tee - found
-- RTLSDR: bias-tee support included.
-- Looking for rtlsdr_set_tuner_bandwidth
-- Looking for rtlsdr_set_tuner_bandwidth - found
-- RTLSDR: tuner badwidth support included.
...
-- Configuring done
-- Generating done
-- Build files have been written to: /home/pi/AIS-catcher/build
-- Configuring done
-- Generating done
-- Build files have been written to: /home/pi/AIS-catcher/build
make (=> This took approx 10 minutes on a RPi 3)
sudo make install
Above we can see that the build generator found the dependency for RTL-SDR.
It should also be said that if you want the latest changes, since the last release(with wget), use "wget https://github.com/jvde-github/AIS-catcher/archive/refs/heads/main.zip"
Test the install with
pi@test:~/AIS-catcher/build $ AIS-catcher -l
AIS-catcher (build Feb 18 2024) v0.56-122-gf99160f8
(C) Copyright 2021-2023 jvde-github and other contributors
This is free software; see the source for copying conditions.There is NO
warranty; not even for MERCHANTABILITY or FITNESS FOR A PARTICULAR PURPOSE.
Found 1 device(s):
0: NooElec, NESDR Nano 3, SN: 5566669999
Check if you receive any data from the dongle with a connected antenna.
AIS-catcher -v 10 -u 127.0.0.1 10110
"-u 127.0.0.1 10110" makes the application forward UDP messages to local host port 10110. There is a built in WEB-server which you activate adding "-N 8100" where 8100 is the port number where you find the WEB page.
AIS-catcher -v 10 -u 127.0.0.1 10110 -N 8100
Use the below URL for a host "test".
http://test.local:8100
To get distances to the AIS targets you have to tell the application where you are so
AIS-catcher -v 10 -u 127.0.0.1 10110 -N 8100 -N LAT 56.00 LON 12.00 SHARE_LOC on
Update
It's almost the same as install. In your home directory "/home/pi"
sudo apt update && sudo apt full-upgrade -y && sudo apt clean
rm v0*
rm master.zip
rm -rf AIS-catcher
wget https://github.com/jvde-github/AIS-catcher/archive/refs/tags/v0.70.zip
unzip v0.70.zip && mv AIS-catcher-0.70 AIS-catcher
cd AIS-catcher
mkdir build
cd build
cmake ..
mkdir build
cd build
cmake ..
make
sudo systemctl stop ais
sudo make install
sudo systemctl start ais
Autostart
The recommended autostart is using systemd. Here is info that does the job but I did a simple one below.
Create the servicefile
sudo nano /etc/systemd/system/ais.service
and add the info
[Unit]
Description=AIS
After=syslog.target network-online.target
[Service]
Type=simple
User=root
ExecStart=/usr/local/bin/AIS-catcher -v 10 -u 127.0.0.1 10110 -N 8100 -N LAT 56.00 LON 12.00 SHARE_LOC on -X
Restart=on-failure
RestartSec=10
KillMode=process
[Install]
WantedBy=multi-user.target
and then to activate and check
pi@test:~ $ sudo systemctl daemon-reload
pi@test:~ $ sudo systemctl enable ais
Created symlink /etc/systemd/system/multi-user.target.wants/ais.service → /etc/systemd/system/ais.service.
pi@test:~ $ sudo systemctl start ais
pi@test:~ $ sudo systemctl status ais
● ais.service - AIS
Loaded: loaded (/etc/systemd/system/ais.service; enabled; preset: enabled)
Active: active (running) since Mon 2023-12-11 23:33:43 CET; 16s ago
Main PID: 1473 (AIS-catcher)
Tasks: 5 (limit: 765)
CPU: 3.897s
CGroup: /system.slice/ais.service
└─1473 /usr/local/bin/AIS-catcher -v 10 -u 127.0.0.1 10110 -u 127.0.0.1 10111 -N 8100 -N LAT 56.117 LON 12.603 SHARE_LOC on -X
Dec 11 23:33:52 test AIS-catcher[1473]: !AIVDM,1,1,,A,13=@ir01iE0ppftP8NLU6l1T0@NJ,0*39 ( MSG: 1, REPEAT: 0, MMSI: 215233000, signalpower: -14.0567, ppm: 2.31481, timestamp: 20231211223351)
Dec 11 23:33:52 test AIS-catcher[1473]: !AIVDM,1,1,,B,13u=7U003M0qW8HP65EL79gV0<0Q,0*1D ( MSG: 1, REPEAT: 0, MMSI: 265504660, signalpower: -13.851, ppm: -2.02546, timestamp: 20231211223352)
Dec 11 23:33:54 test AIS-catcher[1473]: !AIVDM,1,1,,A,1815=F@w1>PqA=lP7BqTuCu`0<13,0*74 ( MSG: 1, REPEAT: 0, MMSI: 538004825, signalpower: -3.77949, ppm: 1.44676, timestamp: 20231211223354)
.....
.....


Comments
wget https://www.aishub.net/downloads/dispatcher/install_dispatcher
chmod 755 install_dispatcher
sudo ./install_dispatcher
Post a Comment
Feel free to leave a comment ! ... but due to a lot of spam comments I have to moderate them. Will reply ASAP !