Router as WiFi extender
Extending Your WiFi via cable have the advantage, compared to extending via WFi, that You keep the bandwidth at max. Extending Your WiFi with products that use the same frequencies, as Your WiFi, will just put through 50% of the data flow.
One way to extend the WiFi is with a cheap router, or maybe an old router You don't use any more.
- Power up the router.
- Do a factory reset.
- Connect, with an ethernet cable, a computer to one of the routers LAN ports.
- Check the routers manual which IP address You shall use to reach the admin GUI in Your browser. Could be http://192.168.0.1 ?
- If Your computer is set to receive an IP address automatically You will see the logon screen. Otherwise You will have to set it manually in Your computer.
- Log on to the router with default admin and password.
- Disable UPnP.
- Disable DHCP.
- Change the LAN IP address to an available, fix, address on your network. Preferred is an IP address outside the DHCP range.
- Set up the WiFi with the same SSID, Wireless security and password as You already have chosen for Your "first" WiFi.
- Power down the router and disconnect the computer.
- Connect the router to Your LAN via one of the LAN ports. (Don't use the WAN port).
- Connect the power and now You should be up an running.
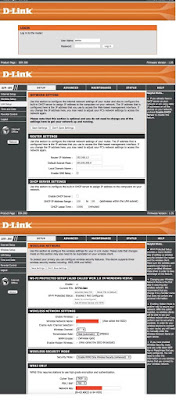
Set up for a D-Link DIR-300

- Power up the router.
- Do a factory reset pressing the reset button on the back.
- Connect, with an ethernet cable, a computer to one of the routers LAN ports.
- Open a web browser and enter http://192.168.0.1.
- Log on to the router with user "admin" and no password.
- Click on Advanced and then click Advanced Network. Uncheck the Enable UPnP checkbox. Click Save Settings to continue.
- Click Setup and then click Network Settings. Uncheck the Enable DHCP Server server checkbox. Click Save Settings to continue.
- Under Router Settings, enter an available IP, fix, address and the subnet mask of your network. Preferred is an IP address outside the DHCP range. Click Save Settings. Use this new IP address to access the configuration utility of the router in the future.
- Set up the WiFi with the same SSID, Wireless security and password as You already have chosen for Your "first" WiFi.
- Power down the router and disconnect the computer.
- Connect the router to Your LAN via one of the LAN ports. (Don't use the WAN port)
- Connect the power and now You should be up an running.
- You may use the other three LAN ports to connect other Ethernet devices and computers.


Comments
Post a Comment
Feel free to leave a comment ! ... but due to a lot of spam comments I have to moderate them. Will reply ASAP !