
Node-Red on MCU:s, Raspberry Pi Pico W
Since I'm not a programmer, and probably never will be 😉, I really like Node-Red(NR). NR is also a nice way trying to learn some JavaScript via the function nodes.
I also appreciate hardware, MCUs, like ESP32 and Raspberry Pi Pico but find it a little hard to code in MicroPython or C++.
Somewhere ?? on the WEB i found some applications that can export NR json code to C++ and run it on several MCUs.
As you understand I had to check it out...
Intro
Info source
This blogpost got me going which explains which components cooperates to make it happening.
Method
- Design the flow with Node-RED.
- The node-red-mcu-plugin
- Installs node-red-mcu
- Converts NR JSON to JavaScript objects that are compatible with MCUs
- Moddable translates the JavaScript project into C++ code
- Moddable calls the tool-chain of the board to build, link, upload and launch the project
MCUs that works
Here you find lists of different hardware that should work with this setup
NR Nodes ?
Implemented NR nodes are found here.
Hardware
In a project, switching on a display when people approached, I used a Raspberry Pi Pico W(RPiP) so this test was done with that MCU.
Install
The installation was done on a Raspberry Pi 3 B+(RPi) with SSD disk and GUI. Since running headless I'm using RDP for remote access.
Node-Red
Install Node-Red
Moddable
Start install with an update
sudo apt update
and continue with the installation instructions found here.
Raspberry Pi Pico C SDK
Check out the install instructions here but please note that you, for the moment with RPiP, must use the v1.4.0 SDK instead of the latest one. So change the install command at "5" to
git clone -b 1.4.0 https://github.com/raspberrypi/pico-sdk
NR node-red-mcu-plugin
Go to the NR folder
cd $HOME/.node-red
and install the latest release with
npm install @ralphwetzel/node-red-mcu-plugin
There are continuous updates so another way to get the latest code changes are
npm install https://github.com/ralphwetzel/node-red-mcu-plugin.git
NR settings
process.env.MODDABLE = "/home/pi/Projects/moddable"
Restart NR with "sudo systemctl restart nodered" and open up the NR editor.
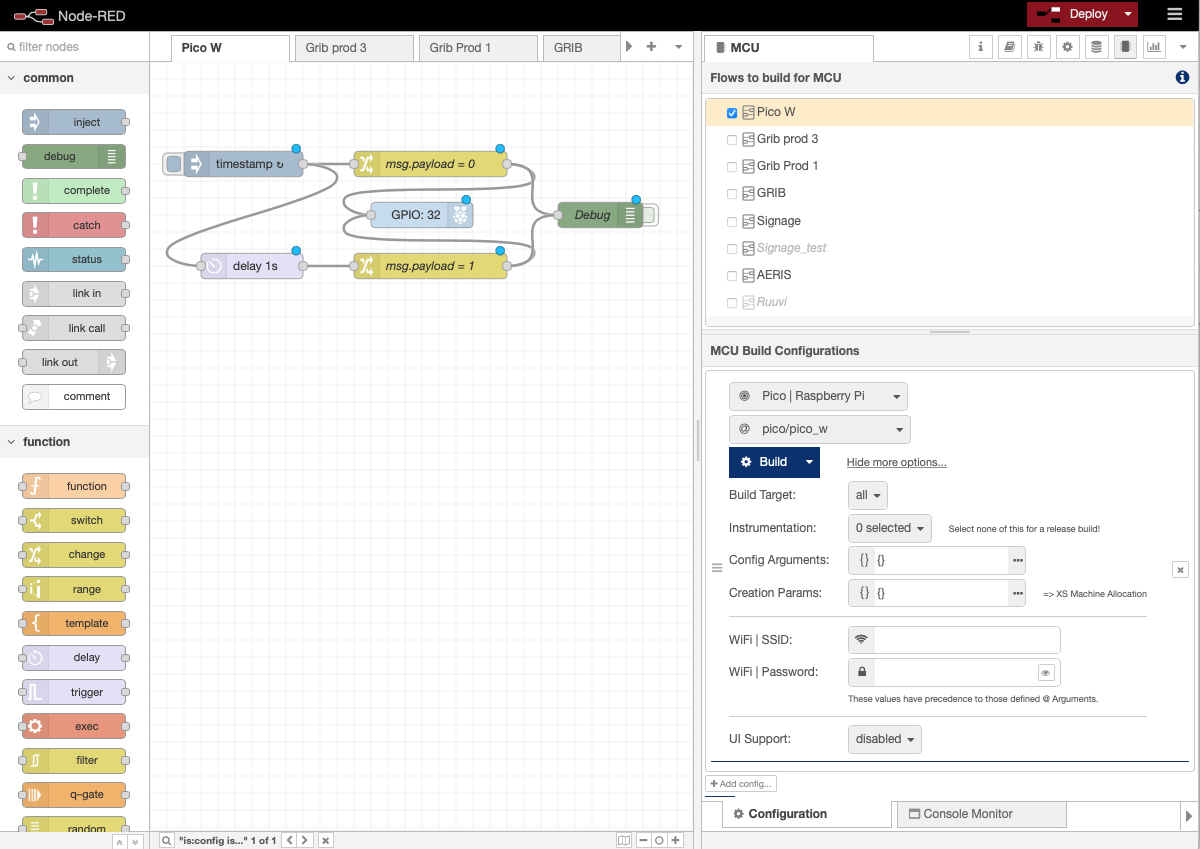
Testing
As seen in the picture above a new pane, MCU, have appeared. In the top pane you choose the flow to port to the RPiP. In bottom pane you choose the target hardware and some other options.
When you are ready, just click on the blue "Build" button and the process begins.
Click on "Console Monitor" where you wait for
Making: /home/pi/Projects/moddable/build/bin/pico/pico_w/release/tns8c0j9h9b/xs_pico.uf2 from xs_pico.elf
Hold the BOOTSEL button and power-cycle the device.
Waiting for RPI-RP2.....................
Hold the "BOOTSEL" button on the RPiP and connect it to the RPi. Release the button and the code will be copied to RPiP and then executed.
Wrap up
Other platforms
Thanks
@ralphwetzel who helped me through some obstacles.
More to learn
This post is just "scratching the surface", of the pretty complex environment, so there is much more to learn......
Example code
The below code will just flash the built in LED, on a RPiP, but it's a beginning to explore the "new world".
[{"id":"de2b52ae6178cb33","type":"tab","label":"Pico W","disabled":false,"info":"","env":[],"_mcu":{"mcu":false}},{"id":"cebfb24544967835","type":"inject","z":"de2b52ae6178cb33","name":"","props":[{"p":"payload"},{"p":"topic","vt":"str"}],"repeat":"2","crontab":"","once":false,"onceDelay":0.1,"topic":"","payload":"","payloadType":"date","_mcu":{"mcu":false},"x":110,"y":120,"wires":[["be0a357e91d08089","aeed63a3e2d4490b"]]},{"id":"aefd36d5d98546bc","type":"rpi-gpio out","z":"de2b52ae6178cb33","name":"","pin":"32","set":"","level":"0","freq":"","out":"out","bcm":true,"_mcu":{"mcu":false},"x":320,"y":180,"wires":[]},{"id":"be0a357e91d08089","type":"change","z":"de2b52ae6178cb33","name":"msg.payload = 0","rules":[{"t":"set","p":"payload","pt":"msg","to":"0","tot":"num"}],"action":"","property":"","from":"","to":"","reg":false,"_mcu":{"mcu":false},"x":330,"y":120,"wires":[["aefd36d5d98546bc","2b3ee1aba0dea53c"]]},{"id":"aeed63a3e2d4490b","type":"delay","z":"de2b52ae6178cb33","name":"","pauseType":"delay","timeout":"1","timeoutUnits":"seconds","rate":"1","nbRateUnits":"1","rateUnits":"second","randomFirst":"1","randomLast":"5","randomUnits":"seconds","drop":false,"allowrate":false,"outputs":1,"_mcu":{"mcu":false},"x":120,"y":240,"wires":[["67f1ad20560e995a"]]},{"id":"67f1ad20560e995a","type":"change","z":"de2b52ae6178cb33","name":"msg.payload = 1","rules":[{"t":"set","p":"payload","pt":"msg","to":"1","tot":"num"}],"action":"","property":"","from":"","to":"","reg":false,"_mcu":{"mcu":false},"x":330,"y":240,"wires":[["aefd36d5d98546bc","2b3ee1aba0dea53c"]]},{"id":"2b3ee1aba0dea53c","type":"debug","z":"de2b52ae6178cb33","name":"Debug","active":false,"tosidebar":true,"console":false,"tostatus":false,"complete":"payload","targetType":"msg","statusVal":"","statusType":"auto","_mcu":{"mcu":false},"x":530,"y":180,"wires":[]}]


Comments
Post a Comment
Feel free to leave a comment ! ... but due to a lot of spam comments I have to moderate them. Will reply ASAP !